Live Reporting for on-premise ERP systems
Solver Cloud offers customers with on premise ERPs the ability to report live off these systems using the Solver Cloud Agent. After performing a quick installation and configuration process, a customer will be able to connect any of the below mentioned ERPs, that they host on their systems, to Solver Cloud.
Supported On Premise ERPs for both Reporting and Budgeting
- Dynamics GP2013+
- Dynamics SL
- Dynamics NAV (Business Central On Premise)
Supported On Premise ERPs for Reporting ONLY
- Acumatica 2016+
- Dynamics AX2009
- SAP B1 v9.0+
Because Solver is a cloud service, and many of our users have on-premise ERP systems, we introduce Solver Cloud Agent. The Cloud Agent is a gateway agent that acts as a bridge providing fast and secure data transfer between the on-premise ERP data and the Solver portal.
Solver Reporting Cloud Agent
This installation guide applies to users of on-premise ERP systems, such as Microsoft Dynamics GP, SL and Nav, as well as many other ERP’s.
To set up such an environment, users are required to install a Cloud Agent on their server(s) to create a gateway. The Cloud Agent allows Solver to access data from your on-premise ERP databases.
Installing and configuring the Cloud Agent is usually done by an administrator. It may require special knowledge of your on-premises servers, as well as your ERP system.
How to install Solver Cloud Agent?
TECHNICAL REQUIREMENTS
Minimum requirements:
- 64-bit version of Windows Server 2012 R2 (or later)
Recommended:
- 4 core CPU
- 4 GB memory
- SSD storage
- 64-bit version of Windows Server 2012 R2 (or later)
Minimum requirements: Report Designer:
(These might change to conform with Portal requirements.)
- Windows 7 or higher (32-bit or 64-bit) or Windows Server 2012 or higher
- Microsoft Office Excel 2013 or higher (32 or 64 bit)
- .NET Framework 4.7.2.
BEFORE INSTALLATION
Usually, an administrator installs and configures the Cloud Agent, as it may require special knowledge of your on-premises servers, as well as your ERP system. Here are a few things to consider before installing the agent:
- If you are installing on a laptop, and your laptop is turned off, not connected to the internet, or asleep, the Cloud Agent won’t work and Solver Reporting will not be able to retrieve data.
- If your machine is connected to a wireless network, the gateway may perform more slowly.
Let’s do this!
Install the Cloud Agent
- In the Solver portal, go to Get Data, click New, and download the installation file.
- Select the file path where you want to install the agent. NOTE: The closer the Cloud Agent is to the server, the faster the connection will be. It is recommended to install the Cloud Agent on a machine that can be left running all the time.
- Click Install.
The Cloud Agent Administration screen opens in your browser (http://localhost:5002/). From here, you can add a data source and pair it with a connection in the Portal.
Add data source
- In Cloud Agent Administration, click Add data source.
NOTE: If you are using proxy server, click the Settings button to access the proxy server settings.
NOTE: You can access the Cloud Agent Administration at any time to add data sources, from http://localhost:5002.
Under Database access, you specify connection details to your ERP system database.
- In the Server name field, enter the name of your SQL server.
- In the Database field, enter the database name of your ERP master database.
- Under Authentication, select SQL Server Authentication or Windows Authentication*. If you select SQL Server Authentication, you must fill in Login name and Password.
- Under File access, in the Add path field, specify the file path to vouchers, if you will be using vouchers. You can add multiple paths here, by clicking the Add
NOTE: The account running the Solver Cloud Agent service must have access to the paths added here. By default, this account is the local system account. - In the Name field, enter a name for this data source.
- Click Save.
*You can choose if you set up the connection with an SQL user or Windows authentication:
SQL user: If you set up using an SQL user, this user’s level of access controls the general level of access for all users in Solver (read access for running reports, read+write access if you want to do budgeting and write back to the system).
Windows authentication: If you use Windows authentication, the account running the Cloud Agent service must have access to the databases on the SQL server. The Solver Cloud Agent service is by default set up to run with a local system account. However, this can be changed to another account.
You will now receive a Pairing Key that you must use to set up a connection in the Solver portal. Copy the pairing key, you will need it when you set up connections in Solver.
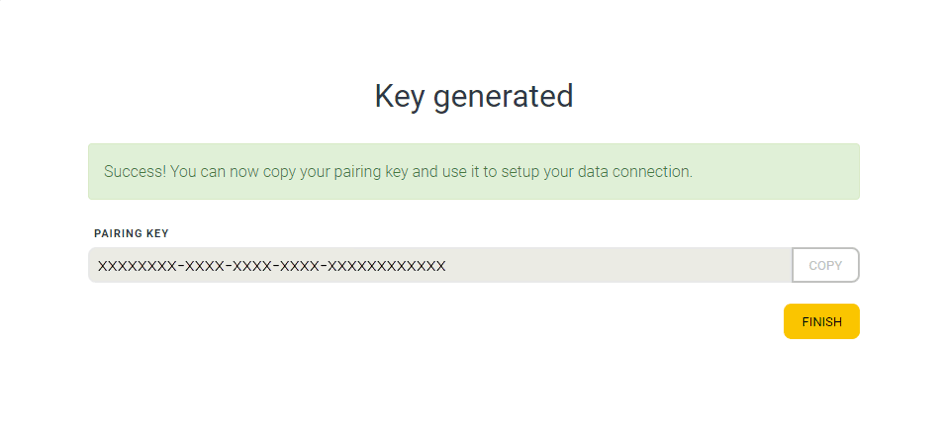
IMPORTANT: It is important that you copy and keep your Pairing Key. Solver cannot access this information as it is your private information.
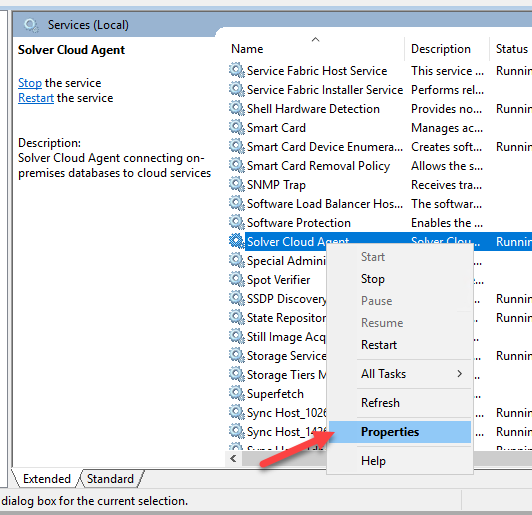
Change Solver Cloud Agent service account
You can change the Solver Cloud Agent service account. By default, this is set up to be local.
- Open Control Panel > Administration tools > Services.
- Find the service Solver Cloud Agent.
- Right-click the service and select Properties.
- On the Log On tab, select the This account.
- Enter account name and password.
- Click OK.
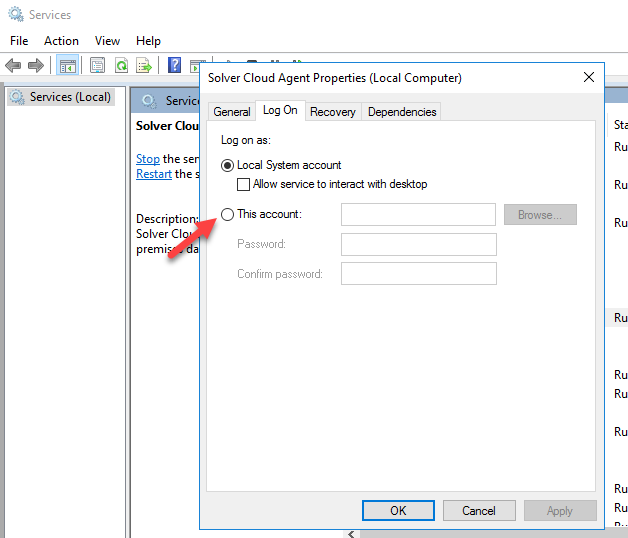
NOTE: The account you set up here is also the account that needs permission to access the path(s) where the vouchers are stored.
Set up connection in Solver
Next, you must, set up a connection to your data from Solver.
NOTE: To get access to the Solver portal, you must accept the invitation in the email you received from Solver.
To setup a connection between Solver and your ERP database:
- Be sure that you still have the pairing key that was generated earlier in the installation.
- Click Get Data on the left hand side.
- If you do not see this menu option, you need to be granted “Can manage connections” permissions by an administrator.
- If no connections have been made, in the popup that appears choose the integration for your ERP system.
- Click Next
- You will be prompted for your Pairing key, paste it in.
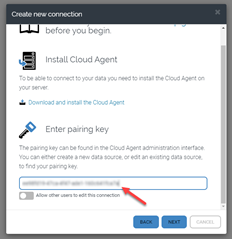
- There is the option to allow others to edit/modify this connection. Enable this option only if others with “can manage connections” permissions should modify this.
- You will then be prompted to select the companies that should be made available in Solver.
- The number of companies available is based off the number of companies purchased.
- Create a name for the Connection. It is recommended to do a descriptive name identifying where the Hybrid Agent has been installed for troubleshooting purposes.
- Click Finish.
- The connection has now been established and you can begin to create your first report.