BI360 comes with a robust connector to Acumatica. With some configuration on the organization’s Acumatica site done prior to connecting to BI360, an organization can quickly connect BI360 Cloud to their Acumatica data via OData. Once the data is loaded, an organization can use BI360’s Reporting application to create meaning financial and operational reports.
BI360 Acumatica Connector utilizes the following technologies.
- Acumatica OData
Configuring BI360 access to Acumatica
In order for BI360 to connect an organization’s Acumatica data, it is required that the following is done:
- A web service account is created in Acumatica.
- Note: BI360 does not include any licensing to Acumatica.
- Endpoints are created in Acumatica and are “Exposed via Odata”.
Creating a Web Service Account
An organization should refer to Acumatica’s user guide or their Acumatica consultant for steps on creating a user. The web service user requires at least “view only” permissions to any module that BI360 will connect to.
Creating an Odata Endpoint
An organization should contact their Acumatica consultant for best practices to add OData endpoints. Some recommendations that Solver can provide are:
- Limit the number of columns made available in the OData endpoint to just the data the organization wants to bring in.
- OData has a limitation to the number of columns that it can receive. Designing an OData endpoint that only the necessary data is required.
- Use Acumatica’s default Hidden “site map” or create a new site map that is hidden and assign all OData endpoints to this menu. This is recommended as typically an odata endpoint is a duplicate of another screen in Acumatica.
The following will guide the user through creating an OData endpoint for General Ledger data. We will walk you through the creation of the Account OData Endpoint and then the General Ledger Endpoint. The steps to create other dimensions that have been added to your General Ledger (sub account, department etc) are exactly the same as creating the Account endpoint and are not documented here.
Account OData Endpoint
- Log into Acumatica with an account that has administrator permissions.
- Click on System -> Customization.
- On the left hand navigation pane, click on Generic Inquiry. The main grid will load with all with a drop down that displays all configured inquiries.
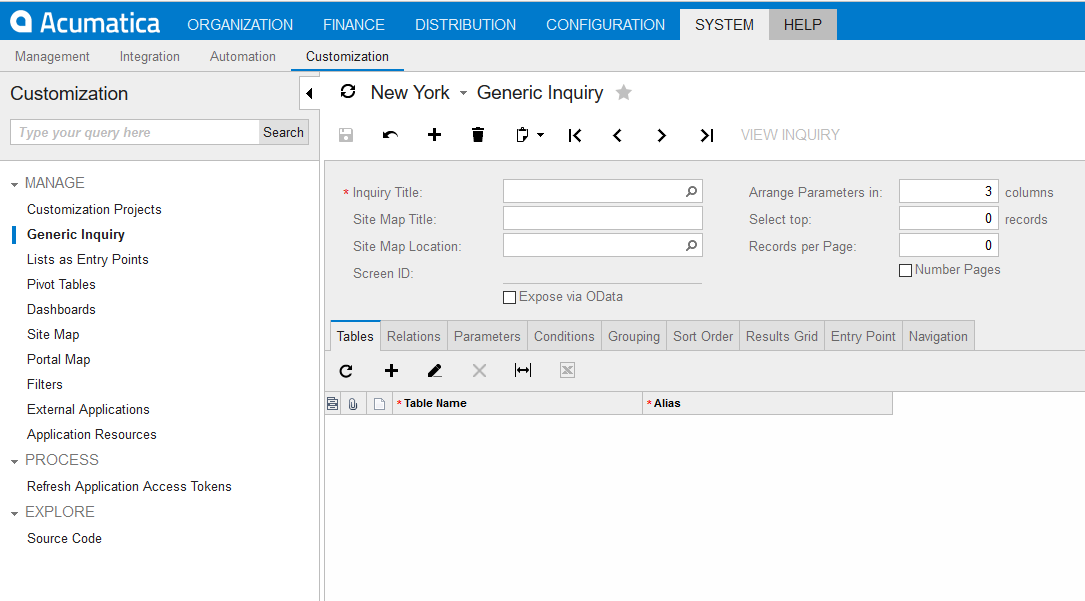
- Users can click the lookup icon in the Inquiry Title textbox to find a list of all creating Generic Inquries. In this case, since no BI360 specific inquiry has been created we will be creating on. To create create a new inquiry, click the
 icon.
icon. - The cursor focus will be set in the Inquiry Title text box and begin typing the name of this inquiry. It is recommend to put BI360 in front of any BI360 related inquiry so that it is easier to find them later on. In this case, call it BI360 Chart of Accounts.
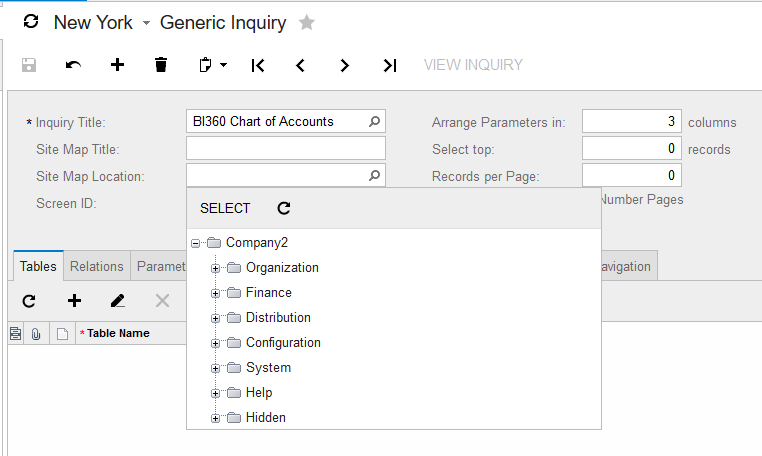
- The Site Map title is a user friendly name and can be call BI360 chart of accounts as well.
- In the site map location textbox, click the lookup icon to choose where this information will be stored. As mentioned earlier, it is recommended to place it in the Hidden folder so that it is not seen in the Acumatica interface.