Integrations
Solver Integrations allow the user to connect and load their financial system data into the Data Warehouse from a user-friendly wizard interface.
Users are able to do the following actions:
- Create New Integrations
- Run Integrations
- Copy Integrations
- Edit Integrations
- Export/Import Integrations
- Delete Integrations
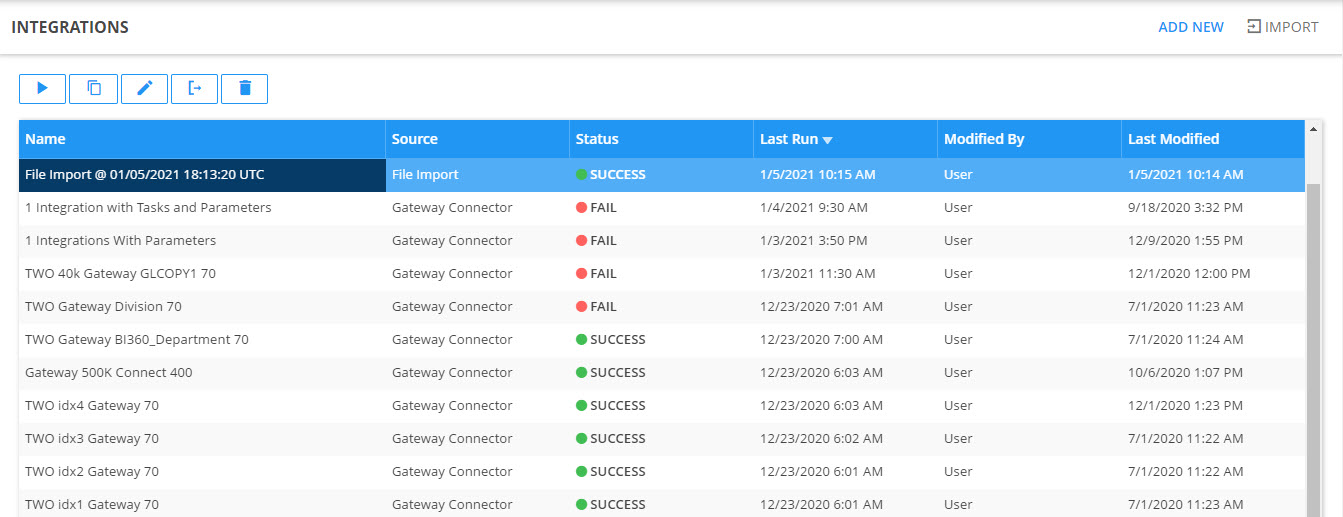
The integrations table shows all integrations previously created and ran by the user. The following integration details are displayed in the Solver Portal:
- Name: The integration name set by the user during integration creation
- Source: Shows which marketplace connector was used to create the integration
- Status: Gives real time update on the status of each integration, and whether they succeeded or failed
- Last Run: Displays the day and time when the integration was last ran
- Modified By: Indicates which user most recently modified the given integration
- Last Modified: Shows the day and time when the given integration was modified by the user in the Modified By column
Creating New Integration
To create a new integration:
- Navigate to Data > Integrations page.
- If Data Warehouse permission to edit integrations are enabled for your user, an Add New button appears at the top right corner of the page.
- Click this to navigate to the Integration Marketplace. This is where you can select the desired Gateway, File Import or ERP connector and kick off the integration creation wizard.
- From here, follow the steps listed in the How to build an Integration help page.
Running Existing Integrations
There are two ways to run existing integrations, either manually select them to run or set them to automatically run within a job. This help page will document how to manually run integrations.
To run an integration manually:
- Navigate to Data > Integrations page.
- If Data Warehouse permission to run integrations are enabled for your user, the Run button () appears as the first button of the top left menu.
- Select the desired integration and click Run.
- The status of the selected job will then update from Queued > Processing. This indicates the job is currently running.
- While the integration’s status shows Processing, the Run button changes to a Cancel button (). If the integration needs to be cancelled for any reason while running, click this button.
- Note that the cancel button currently does not work if an integration is automatically running through a job.
- The integration status will then change to either Success or Fail, indicating the integration finished running.
Editing Existing Integrations
To edit an existing integration:
- Navigate to Data > Integrations page.
- If Data Warehouse permissions to run and edit integrations are enabled for your user, the Edit button () appears as the third button of the top left menu.
- Select the desired integration and click Edit.
- This will navigate the user to the Task Manager step of the integration creation wizard, displaying the current configuration for this integration.
- From here, follow the steps listed in the How to build an Integration help page for notes on how to edit the integration as desired.
Deleting Existing Integrations
To delete an existing integration:
- Navigate to Data > Integrations page.
- If Data Warehouse permission to edit integrations are enabled for your user, the Delete button () appears as the last button of the top left menu.
- Select the desired integration and click Delete.
- The Delete Integration modal appears, asking for user confirmation.
- Clicking Delete will close the modal and remove the integration from the integrations table. Clicking Cancel will close the modal, leaving the integration as is in the integrations table.